Monado Android Sensor Data Flow
Flow流程
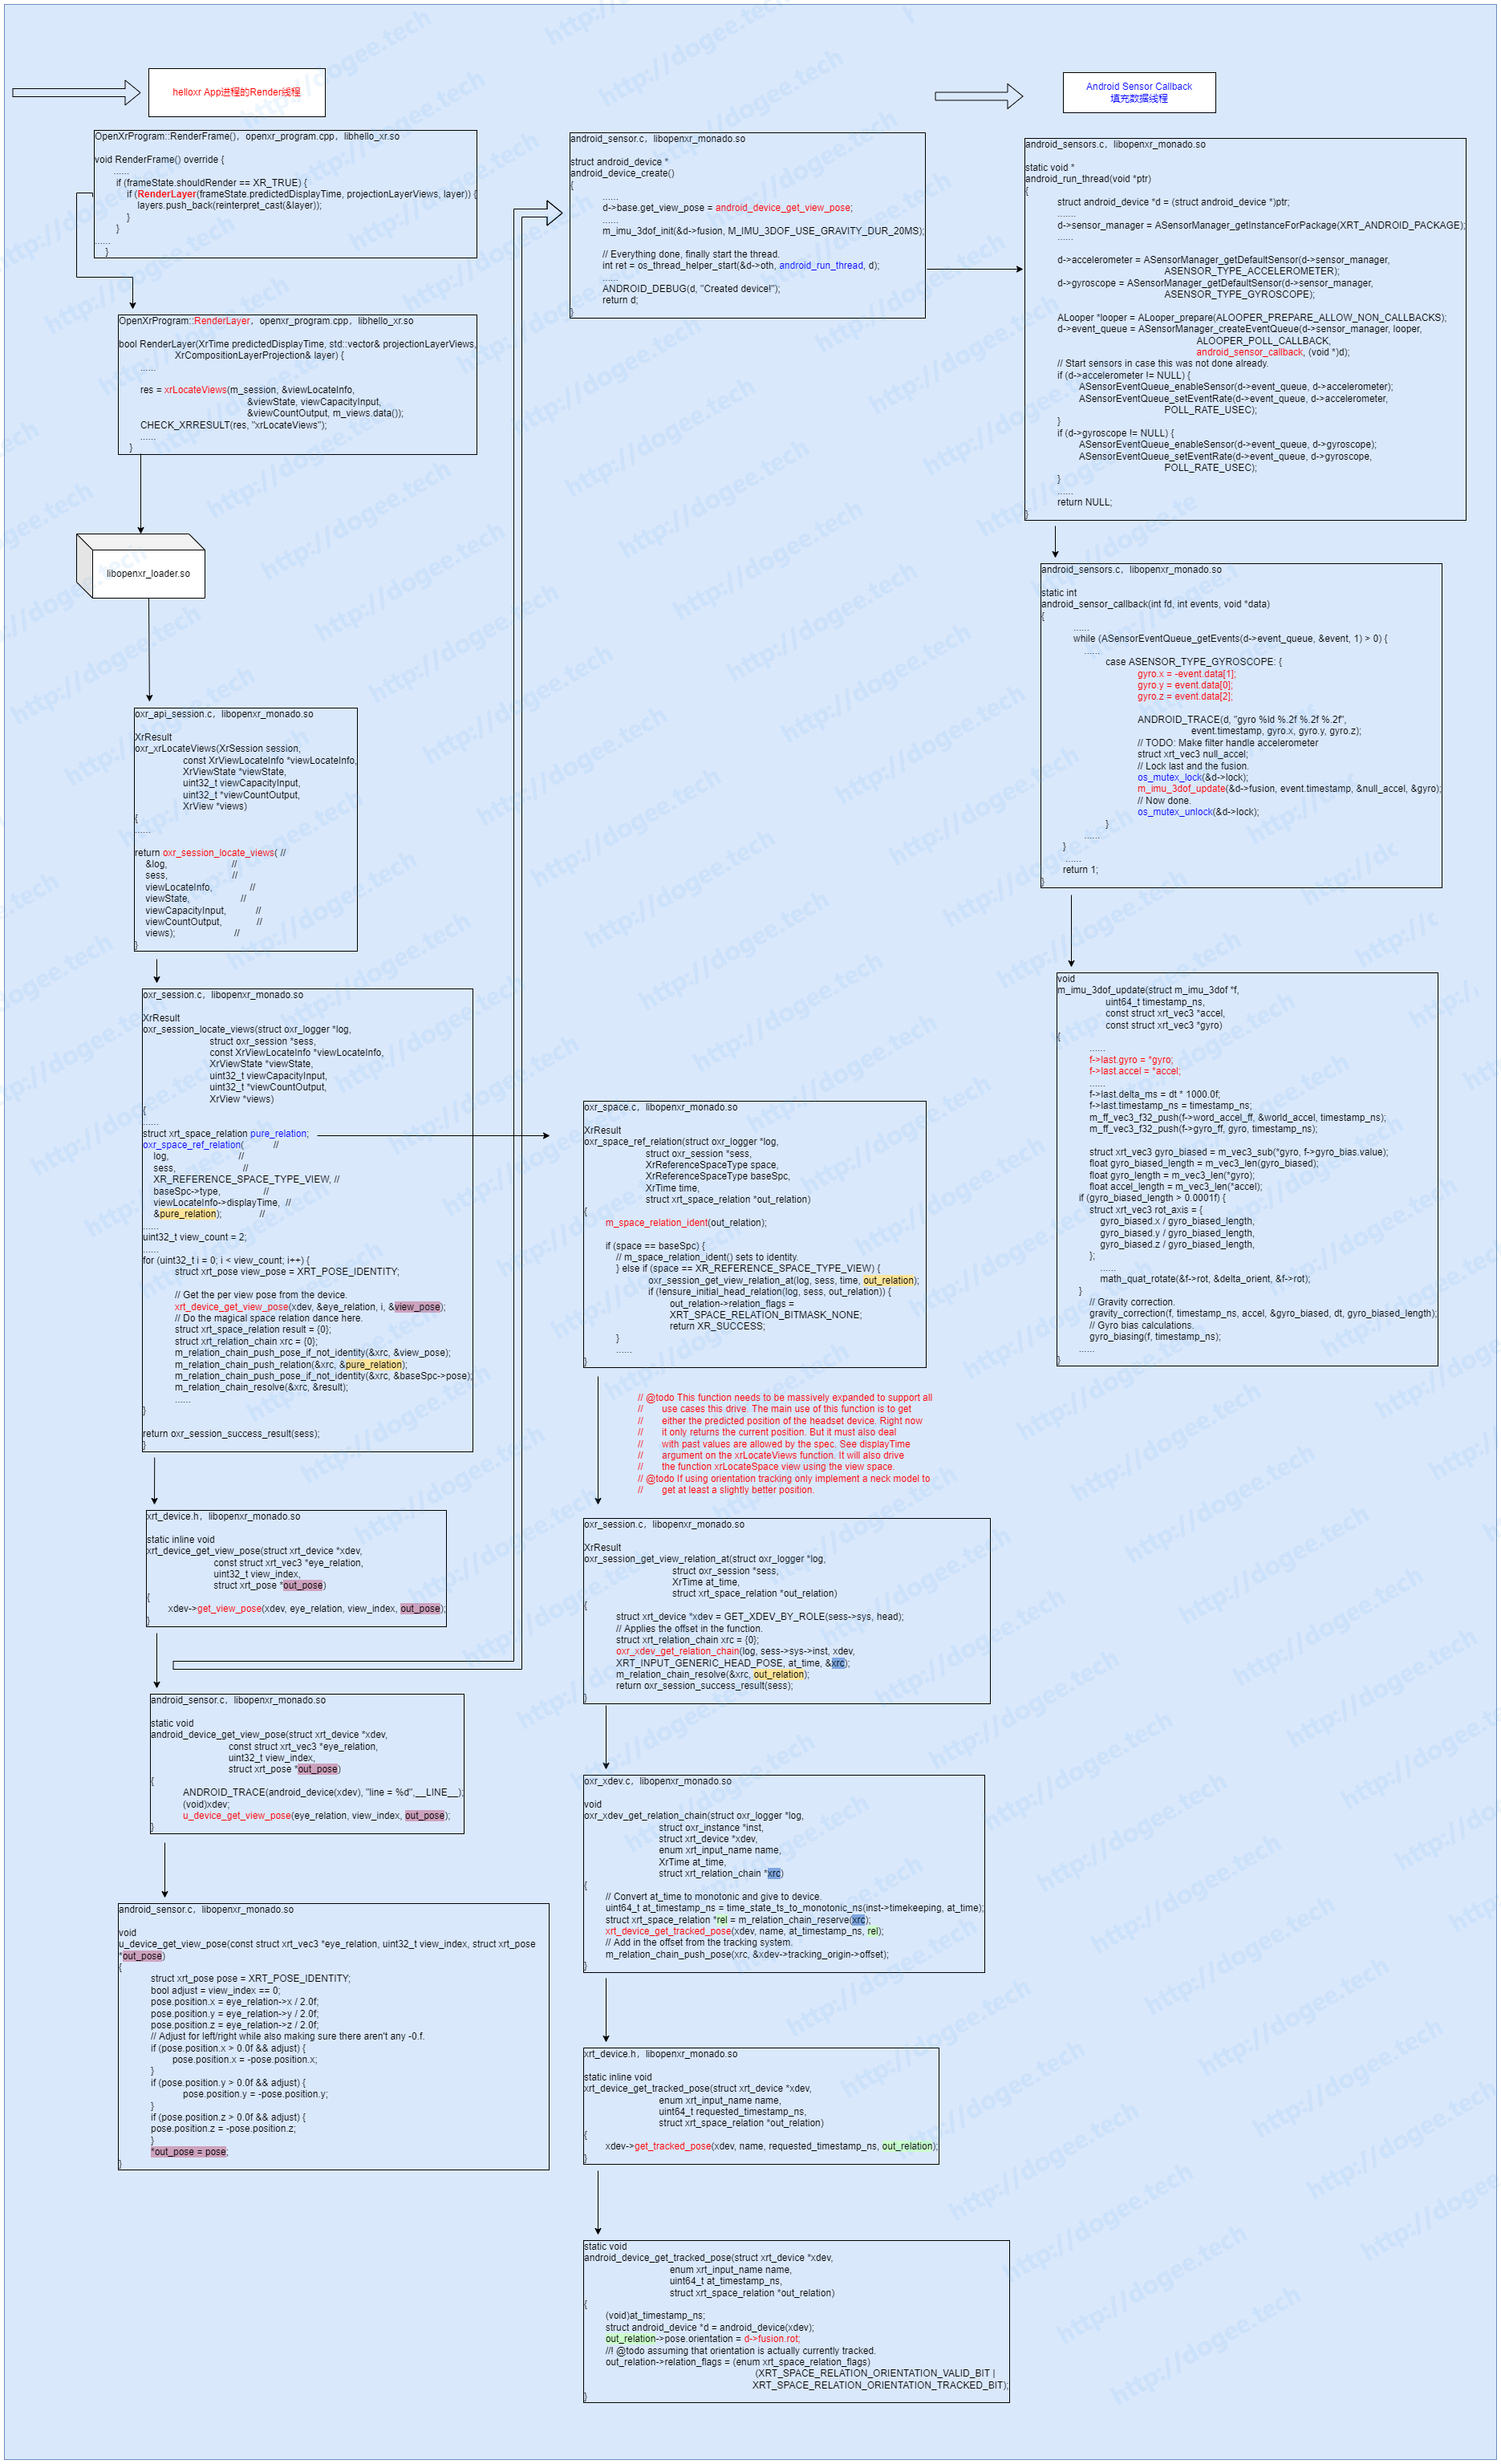
流程上,是两个线程:
- 线程一是app的render线程,每次render的时候都需要去获取xrLocateViews,从而获取到底层Sensor的写完的数据,这里是消费者comsumer。
- 线程二是android的sensor callback,这里会不断做数据填充的动作,这里是生产者provider。
代码解析
生产者:Sensor Callback
provider的部分比较直观,数据是通过ASensorManager_getDefaultSensor(d->sensor_manager,GSENSOR_TYPE_GYROSCOPE);来设置callback的。因此整个的流程也就是从这里触发的。
|
|
sensor callback的部分其实并没有太多可以说的,唯一需要注意的是在设置时有用到ASensor和GSensor,但是实际在数据处理上只是用到了GSensor的数据。
数据的处理中使用的3dof的算法(这里可以挖一个坑,需要去看一下3dof算法大概是怎么回事)。
3dof数据处理:m_imu_3dof_update
这部分的代码是在xrt/auxilary/math目录下的,因此在模块结构上属于是可替换的部分,简单来说未来是可以做为一个计算单元模块放到dsp中去的。
|
|
这里用到了一个数据结构:m_imu_3dof,调用的函数栈:m_imu_3dof_update(&d->fusion, event.timestamp, &null_accel, &gyro);
其中d的数据结构是:android_device,数据结构的部分如下图:
|
|
最终sensor callback中会填充:m_imu_3dof中的rot。
消费者:Render Thread
app端的行为有点出乎我的预料,我本来以为渲染的流程应该是在openxr的防守范围内,但是从实际的代码上来看,是在app内部,也就是说至少在提供Engine SDK的时候需要把渲染的流程也写进去,那么在SDK的层面上,至少需要保证:
- 渲染的流程
- 事件polling的流程
除此之外可能还需要做一些额外的事情,比如在高通现在的SXR平台上的ATW,那么同样的迁移过来:
- TW/SW的流程
事情就变得一下子有点多了,无论如何先从这边的流程分析一下sensor callback的事件是怎么消费的。
整个调用xrLocateViews的流程其实并没有什么特别的,这一块是在先前的文章中也有介绍,在实现上是通过dlopen的方式加载so库到应用进程,从而完成了runtime加载。
重温一下定义:
|
|
展开后:
|
|
因此通过函数跳转链:xrLocateViews -> oxr_xrLocateViews直接定位到:
|
|
这一段的调用函数中其实分为两部分:
- oxr_space_ref_relation
- xrt_device_get_view_pose
oxr_space_ref_relation
其中oxr_space_ref_relation的部分是概况图中间的部分,最终会调用:android_device_get_tracked_pose,可以看到其实就是获取了:android_device.m_imu_3dof.rot
|
|
这边值得注意的是在中间的函数调用链上:
- oxr_session.c,oxr_session_locate_views
- oxr_space.c,oxr_space_ref_relation
- 这里
space == XR_REFERENCE_SPACE_TYPE_VIEW
- 这里
- oxr_session.c,oxr_session_get_view_relation_at
- oxr_xdev_get_relation_chain(log, sess->sys->inst, xdev,
XRT_INPUT_GENERIC_HEAD_POSE, at_time, &xrc); - 这里的参数中:
XRT_INPUT_GENERIC_HEAD_POSE,实际在最后并没有用到,因此在新的平台上要注意一下
- oxr_xdev_get_relation_chain(log, sess->sys->inst, xdev,
- oxr_xdev.c,oxr_xdev_get_relation_chain
- xrt_device.h,xrt_device_get_tracked_pose
- android_sensor.c,android_device_get_tracked_pose
  sequenceDiagram
oxr_session.c ->> oxr_space.c : oxr_session_locate_views
oxr_space.c ->> oxr_session.c : oxr_space_ref_relation
oxr_session.c ->> oxr_xdev.c : oxr_session_get_view_relation_at
oxr_xdev.c ->> xrt_device.h : oxr_xdev_get_relation_chain
xrt_device.h ->> android_sensor.c : xrt_device_get_tracked_pose
整个数据的调用链还是比较清晰的,最后的输出参数为:xrt_space_relation pure_relation,其中的pose为
|
|
其中xrt_space_relation.xrt_pose.position的部分并没有被赋值,而xrt_space_relation.xrt_pose.orientation为:
|
|
xrt_device_get_view_pose
view pose最后是调用到u_device.c的u_device_get_view_pose,这一段函数看起来只是在做一般的偏移纠正,并没有看太明白。
|
|
当获取到view pose后,以及上面得到的relation pose orientation,会参与到
|
|
整个计算过程(现在还没有搞明白),
|
|
所以当运行到这里的时候,从sensor那边获取的GSensor data就被用完了。
总结
- 数据是使用Android的Sensor Callback填充而来,封装成:
android_device.m_imu_3dof.xrt_quat- 速率:
#define POLL_RATE_USEC (1000L / 60) * 1000,16.6ms,1秒60次
- 速率:
- 消费者是App的xrLocateView其中oxr_space_ref_relation,每次会去读取最新的
android_device.m_imu_3dof.xrt_quat- 速率由App端决定
整个流程是一个粗略的认知,但是至少明白了事件往app的送的流程,还存在不少的坑,后面需要厘清的部分有:
- [ ] 3dof 算法
- [ ]
m_relation_chain的用法/意义 - [ ] 除了
XRT_INPUT_GENERIC_HEAD_POSE,其他的Action是怎么封装的